EmerSSH
EmerSSH is a system for Public Key Infrastructure (PKI) and Access Control List (ACL) management on the Emercoin blockchain.
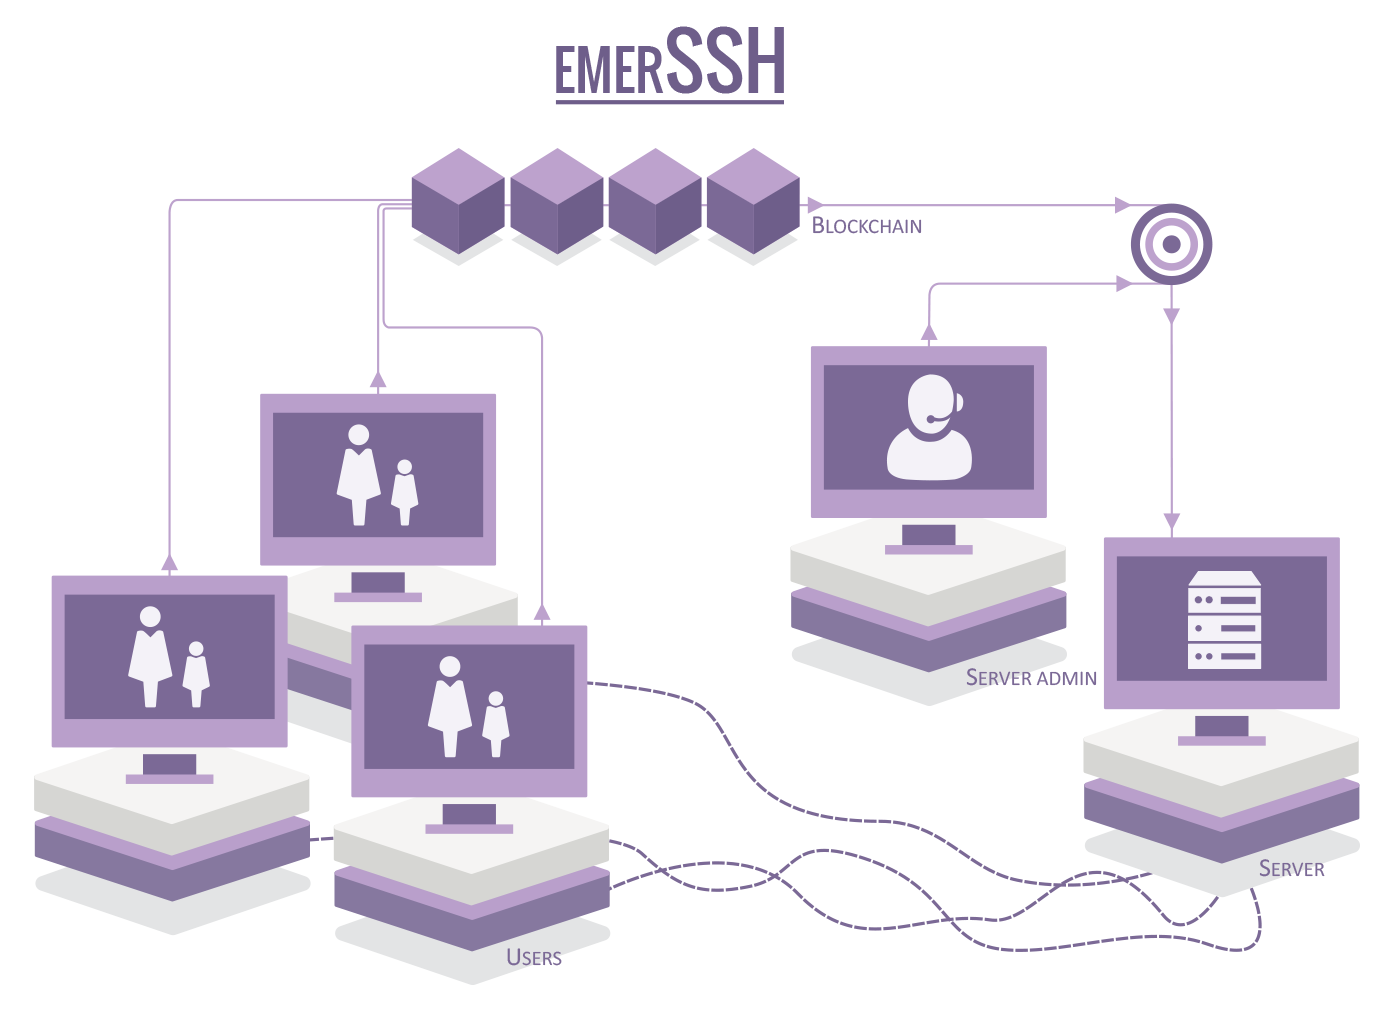
It is possible to create a bridge between OpenSSH and the Emercoin cryptocurrency's blockchain. The result is a comfortable, safe and very flexible way to log in to multiple servers using the SSH protocol.
A simple program EmerSSH provides a bridge between OpenSSH and the Emercoin blockchain, allowing for secure, decentralized management of PKI. When OpenSSH is configured to refer to EmerSSH, the program will query the Emercoin blockchain to retrieve SSH credentials during the authentication process.
Users can manage their own login credentials (public keys) by submitting and modifying records in the EMC blockchain (using the standard Emercoin GUI or command-line daemon. Similarly, admins can manage user groups for their services that may contain references to other groups as well as individual users - allowing for the creation of recursive authentication trees.
EmerSSH operates under the "ssh" service abbreviation in the Emercoin NVS. Records are considered secure and unalterable due to the security provided by the Emercoin blockchain.
Installation
Below are instructions for installing and configuring EmerSSH on Debian and derivative servers such as Ubuntu, and then using EmerSSH to log in to the server from a client computer. We assume that your server is already running the Emercoin wallet.
Installing the necessary packages on the server
First upgrade the existing software:
$ apt-get update
$ apt-get dist-upgrade
Now install curl and jansson:
$ apt-get install libcurl4-openssl-dev libjansson-dev
Next, you need to download and install the latest EmerSSH release:
$ wget https://github.com/emercoin/emcssh/archive/0.0.4.tar.gz  (change to whatever is the latest release)
$ tar xfz 0.0.4.tar.gz
$ cd EmerSSH-0.0.4
$ make
$ make install
Setting up EmerSSH
Now you need to edit the config file /usr/local/etc/emercoin/EmerSSH.conf and change the setting for emcurl. Settings need to match those in your emercoin.conf file.
$ nano /usr/local/etc/emercoin/EmerSSH.conf
Change the value for emcurl:
emcurl http://emccoinrpc:[email protected]:6662/
The values for emccoinrpc and rpcpassword should be taken from your emercoin.conf file. Other parameters can be left as is.
Important: the EmerSSH.conf file should have permissions set to read and write only by the root user. Do not change the permissions on this file as it contains the rpcpassword.
Next, you need to edit the sshd config file, but Debian has a small problem in that the sshd version may be too old and first needs to be updated. Users of other operating systems can skip the next step.
Update OpenSSH on Debian
For starters find out what version of OpenSSH is installed:
$ sshd -v
In response, we get the following message:
unknown option -- v
OpenSSH_6.1p1 Debian
If the version is 6.2 or above, the next step can be skipped. Otherwise, update:
$ nano /etc/apt/sources.list
Add to the end of the line and save the file:
$ deb http://ftp.debian.org/debian/ wheezy-backports main non-free contrib
Update the system:
$ apt-get update
and install sshd:
$ apt-get -t wheezy-backports install openssh-server
The installation script asks whether to disable password authentication. The best response is not to be able to log in the traditional way.
In addition, users of Debian will need to change the file location EmerSSH:
$ mv /usr/local/sbin/EmerSSH /usr/sbin/EmerSSH
Configure OpenSSH
Now we need to edit the configuration file sshd_config:
$ nano /etc/ssh/sshd_config
It is necessary to add some lines:
For Debian:
AuthorizedKeysCommand /usr/sbin/EmerSSH
AuthorizedKeysCommandUser root
For other operating systems:
AuthorizedKeysCommand /usr/local/sbin/EmerSSH
AuthorizedKeysCommandUser root
Now, restart sshd with the new configuration:
$ kill -HUP `cat /var/run/sshd.pid`
Generate an SSH key pair
Now we need to generate a key pair for a user. In Linux, simply type the following command:
$ ssh-keygen -t rsa -b 4096 -C "@your-username"
If the user is running Windows, we recommend using PuTTYgen.
Run PuTTYgen, change the number of bits to 4096 and click Generate.

Wave the mouse cursor on the screen during key generation, after which you should see something like this:

Click Save Private Key and store the key on your computer. Password protection is not needed, therefore, you can agree to save without a password.
Add the public key to the Emercoin NVS
Next, we need to add the public key (highlighted for Windows in the picture above) to the Emercoin NVS as a name->value pair. Do this in your Emercoin wallet on your PC. In the name field, specify:
ssh:<your_username>
In the value field paste your public key from PuTTYgen. The new address field can be left blank. Specify the number of days, and click Submit.

Now we need to wait for confirmation of our transaction. To save time while waiting for confirmation, you can now go back to your server, and add a new user to the file EmerSSH_keys:
$ cd $HOME/.ssh/
$ nano EmerSSH_keys
In the document, simply add your user with @. In my case it is:
@kamillo
Save and close the file.
It should be noted that Emercoin's EmerSSH technology allows not only individual users, but also entire groups. Let's say you want to give three other people access to your servers. You could individually add all users to the EmerSSH_keys file, but it is inconvenient, because every time you add or remove a user you will need to edit this file on all servers. However, there is a more versatile and easy way. Simply create an entry in the Emercoin blockchain, for example kamilloFriends and list all your friends. The fields for such an entry are as follows:
"name" : "ssh:kamilloFriends"
"value" : "@kamillo|@friend1|@friend2|@friend3"
If you need to add or remove someone from the group, it will be enough to make a Name_Update on this entry in the Emercoin wallet. Thus, if in the file EmerSSH_keys I specify the group @kamilloFriends, the system can authorize any of my friends.
Operability test
To make sure that everything works as expected, run the following command:
$ EmerSSH <username>
On my test server I work from the root user, so the command for my username would be:
$ EmerSSH root
In response, we get the following message:
#INFO: verbose=2; maxkeys=4096 recursion=30 EmerSSH_keys=/root/.ssh/EmerSSH_keys; [email protected]:8775/
#Path=/
#Path=/kamillo/
ssh-rsa AAAAB3NzaC1yc2EAAAABJQAAAgEAgmzL............
Perfectly as expected. Everything works. Now let's try to log in.
Without closing the current session, authorize PuTTY to log in without a password. To do this, open a new PuTTY window, enter the IP address of your server then navigate to SSH > Auth in PuTTY:

Click Browse ... and specify the path to your private key.
On the tab Connection > Data we can specify the user under which we want to connect. If not specified, don't worry - in this case the server will ask for the user name when you connect.

Click Open and connect to the server. If it connects then congratulations, you have succeeded!
If the connection fails for some reason, open the window of the previous session and enter the following command:
$ cat /var/log/auth.log
Look carefully for any error messages there and seek solutions to the problem. And if you can't fix it, please ask for help.
Finally, here's another useful command, which shows when visitors log in:
$ grep "Accepted publickey" /var/log/auth.log
Supplementary info for MacOS X users
To be able to log in to an EmerSSH enabled server via the terminal in OS X, you first need to convert your private key to the desired format. I did the conversion in Windows through the program PuTTYgen. It is better to set a password for your key since OS X will complain about it (in the future you will need to enter your password only once).
Run PuTTYgen, click Load and choose our key *.ppk. Next, set a password in Key passphrase and Confirm passphrase. Go to the tab Conversions and export key in the format of OpenSSH:

Now we want to add the key to the OS X system. Open a terminal and navigate to the folder where you exported the key. I have a folder named Keys:
$ cd Keys
Set the key as read-only, otherwise the system will complain:
$ chmod 0400 <your_key_file>
Add the key:
$ ssh-add <your_key_file>
In response, we receive a message that an identifier was added. Check the connection with the command:
$ ssh root@<your_server_ip>
If the server does not ask for a password, then all is well.
More info
- See the following article on medium: What is EmerSSH? FAQ.